Saturday, December 31, 2011

Goodbye 2011, Hello 2012

How do you feel about 2011?  I generally have mixed feelings about every year, but this one in particular seemed to be falling on the not so good side of life.  So much so, that I was pretty well wishing it away.

But then, at the last minute, here came this little fella - to remind me that there is always a fresh start, that nothing is ever all bad and things can always be redeemed, even at the last minute.


Happy New Year, everyone.
Here's to new beginnings.

Wednesday, October 5, 2011

Muesli Squares

Have you ever made your own muesli bars?  If not, you should try!  It's super easy and you can put in whatever grains, seeds, nuts or fruit you like!  Or leave them out if you don't like.  It's really versatile and the combinations are as limited as your imagination and taste buds will allow.

I found my recipe here, but I changed it to suit my own ingredients because while I was cleaning out my pantry recently, I discovered this...


I think I may have bought it at the beginning of the year with lots of good intentions to start eating a nice healthy breakfast (it is awesomely delicious mixed with greek yoghurt and fresh blueberries), but somehow it got pushed to the back of the cupboard and forgotton.  Since the best before date is the end of the month, I figured there was no way I could slog through a whole box of muesli  in a few weeks, so muesli bars (or squares, in my case) would be perfect!

Instead of including a whole heap of seperate dry ingredients, I simply added up the amount needed in the original recipe (five cups), used the muesli (which came to four cups) and topped it up with the last of Miss Six's cornflakes, the last of a packet of craisins (dried cranberries) and some extra sultanas to make the five cups.  Not only did I get some yummy muesli treats, but I got more space in my pantry too!

So here's my recipe...

Homemade Muesli Squares


Ingredients

5 cups of dry ingredients (cereal, grains, dried fruits, seeds, nuts, whatever you like)
125g unsalted butter
1/2 cup honey
1/3 cup brown sugar

Method

1. Preheat oven to 180 degrees.  Grease and line a 3cm deep, 16cm x 28cm (base) baking pan with baking paper. Cook your dry ingredients (without fruit, although I didn't bother seperating the stuff that was already in the muesli) in a frying pan over medium heat, stirring, for 8 to 10 minutes or until golden.


Transfer to a bowl. Set aside to cool. Stir in dried fruit if you are adding extra.

 
2. Cook butter, honey and sugar in a small saucepan over medium heat, stirring, for 3 to 4 minutes or until sugar dissolves. 

Bring to the boil. Reduce heat to low. Simmer, without stirring, for 7 minutes or until mixture forms a soft ball when a little is dropped into ice-cold water. Add to dry ingredients. Stir until combined

3. Spoon mixture into pan. Use a large metal spoon to press down firmly.


Cook in oven for 5-7 minutes.  Allow to cool. Cut into squares - it may still be quite soft but will harden up a bit on refridgeration. Store in an airtight container (I put baking paper between layers to stop the pieces sticking together)  in the fridge.

Obviously these are designated snackage for myself and the hubby as the muesli I used is not nut-allergy friendly for Miss Six (it has almonds, which she is actually not allergic to, but just in case) so I am working on a nut free version for her to take in her lunchbox to school.

Here's the finished product with a little more blue/green love and a sneek peak of my latest crochet project.


Yum!  If you'd like some more baking inspiration, head on over to the girls at A Spoonful Of Sugar for some yummy ideas and links to which you can add your own delicious treats!
Happy baking!

Tuesday, September 27, 2011

Blue And Green Shall Not Be Seen...

Unless you happen to come to my place...


Monday, September 5, 2011

The Most Delicious Easiest Peasiest Banana Cake Ever

Can you believe that we still have these sitting in our pantry?


I think it's testament to how much choc Miss Six actually received at Easter time!  I must admit though, since it's hard to buy nut free chocolate for her at other times of the year, we all tend to go overboard a bit.

So anyhow, I suggested to Miss Six that we could add some of her chocolate to some nice lunchbox treats which would mean that not only would she get to eat chocolate at school (not something I normally let her do) but that we'd be able to get through a bit more of that stash.  She whole heartedly agreed and was even generous enough to say that she didn't mind sharing one or two treats with me because "the baby might like to try some of my choc too."  Awww, caring and sharing!

So I turned to my most favourite banana cake recipe which I just love to make into cupcakes.  If you are  short of time and want something yumalicious that you can make in an instant for lunchboxes or afternoon teas or special treats - this is definately it!  I found the recipe a while ago here and it's been one of my most used recipes ever since.  I can imagine it would even make a pretty nice birthday cake with some chocolate or cream cheese icing. You can also go mad with toppings such as choc chips, cinnamon or coffee sugar (you know the large granulated stuff?)  And it's so very easy with hardly any washing up - I wish every cake recipe was like this one!

Quick and Easy Banana Cake

Ingredients
125g butter
3/4 cup sugar
1 tspn vanilla essence (I use extract, it's nicer!  Yes, I am an essence snob)
1 egg
2 ripe bananas, mashed (older bananas taste better)
1 1/2 cups of self raising flour
1/4 cup milk
As much as you like of broken choc pieces or choc chips if you want these through the cake.  We used broken pieces of two large bunnies for the cake mixture and a smaller one for the tops.

Method

1. Melt butter, sugar and essence (extract!) in a medium sized saucepan.
2. Remove from heat
3. Add mashed bananas and stir through until blended
4. Add egg and mix in well.  Stir in flour, add milk and mix in lightly.
5. Stir through your choc if you are using it.
6. Spoon into patty papers or pour into non-stick cake tin
7..  Bake at 170 deg celcius for approx 40 minutes (or about 15-20 minutes for muffins/cupcakes and 6 minutes for mini muffins or fairy cakes)


Before baking...


And after...


And with a sprinkle of icing sugar and a hot cup of tea, here was my the baby's share...


Miss Six rated them as "Extra-extra-yum!"  and from the amount of kicking I was receiving before I ate to the complete stillness afterwards, I can only assume the baby did too.

Friday, August 5, 2011

Finally!

Lookit!  I have FINALLY  finished Miss Six's crocheted granny square throw.


Wow.  I think I started this last winter? (Yes, I did!)  What an effort.  I have to say, stitching it all together was not my most favourite thing....it was not at all soothing like the hooking together of each little square was.  And it took ages and ages and ages.   


But I'm pretty impressed with the final product (as is Miss Six) so I guess that makes it worth it!  Miss Six has asked for me to emboider a name tag with her birth date (similar to gorgoeus Felix's) to sew on as well.  At least that won't take me a year!

Tuesday, July 26, 2011

The Reason

HELLO!

So obviously I've not been around for a while and I have to say that I have a very good and perfectly just reason for taking such a long unannounced blog break.  You see, there's been quite a bit of pain, some nausea, a scary moment (or should that be, 12 hours), a whole lot of absolutely debilitating exhaustion and this...


I'm currently 18 weeks, the exhaustion has lifted and I'm trying to get as much done as I can before the exhaustion from the third trimester arrives!

I'd personally like to thank the lovely people at the IVF clinic for getting both mine and my husbands respective contributions to cooperate, my gynocologist for putting up with me for the entire past year, my uterus for behaving itself (mostly... we shan't discuss that 12 hours again now, shall we) and my new growing bub who started as a very well behaved egg which did presicely as it was told.  Lets hope that good behaviour continues until said baby is, ohhh, I don't know, 26 at least.

Friday, April 15, 2011

Crocheted Rock No.2

It took me a while to get round to doing it, but here's my next crocheted rock.  I used a brighter variagated green this time and made the pattern up as I went along.  The illustrations are from "The Complete Book Of House Plants" by Russell C. Mott and illustrated by Alan Singer, which I picked up at a second hand bookstore.


Monday, April 11, 2011

If I Were A Busker

What's not to love about a catchy tune who's vid comes complete with a granny square blanket?

Also, tee hee at 2:57.


"Something In The Water" Brooke Fraser

Tuesday, April 5, 2011

Perpetual One

Just recently I (and some other bloggy commenters) won a lovely little suprise from Georgina of Perpetual One just for leaving a comment on her blog.  It was very unexpected and dreadfully nice.  Wasn't that kind and sweet of her?  Here she is!

This gorgeous pic is from Georgina's blog
I have been wanting to visit Georgina for ages - she has a gorgeous caravan-stall at the Peregian Beach markets in Queensland and her next market date is on April 17...not far away at all!  She sells all sorts of lovely vintagey, hand assembled goodness there, has her own Etsy shop, and has even been featured in Country Style, which is one of my most favourite mags.  Good-O!!

This one is too  
So you can imagine my delight at being the recipient of a lovely little brown paper envelope which held a pretty little package inside.


And just look what it was!  A gorgeous vintage hankerchief, hand embroidered with the word "hope" and a sweet card from Georgina, herself.


So lovely, no?

Georgina, do you know - I had some pretty dreadful, nasty things happen to me last week and the very thing I needed most of all was just a little bit of hope.  Thankyou for sending some (and on a hanky to help dry my tears!)  You've no idea how much your small kindness changed my week.  I will hope...over and over.

Monday, March 28, 2011

More Street Art - "Street Fonts" by Claudia Walde

Do you know what I've been loving for quite some time now?  Text as artwork.  There's been lots of it in the interior design world - a huge interest in decoration containing fonts, alphabets and writing. I've even considered printing out and and framing my very first post ...I can't help but smile when I see it and I have the perfect spot!

So if interiors arn't your thing and you havn't a clue what I'm going on about, here's some examples of what's been happening in interior decor for the last couple of years:

Bus rolls:
Image via Desire to Inspire


The iconic "Keep Calm and Carry On":

Image via Manalo For The Home


Appropiate words in appropriate places:

Image via Manalo For The Home


 Favourite song lyrics:
Image via theloveshop on Etsy


Letters and initials:

Image via Design Sponge
And of course, alphabet posters.  Even Ikea has one:

Image via Ikea


Wow! Lots of inspiration there, right?

Well, you probably have already guessed that I'm quite attracted to graffiti art and for those of you familiar with graffiti and street art, you will know it can take many forms, though the origins of graffiti have always been centred around letters and writing. Just see my last post. (And if you're not familiar, you are now living evidence of the phrase "You learn something every day"  Hooray, you!)  

I have been thinking recently about making some artworks for my home combining all these things and so, to invite some major inspiration, have been waiting with absolute bated breath for this to arrive on my doorstep:


And it's finally here!   It's "Street Fonts" by Claudia Walde and boy, oh, boy, it was just as good as I thought it was going to be.

One hundred and fifty-four very creative artists - all with roots in graffiti culture - were given the same brief, according to the foreward;

"... to design all twenty six letters of the Latin alphabet.  How they approached this task and selected the media with which to express their ideas was entirely up to them."

And they are pretty amazing!!
Here's a sneak peek at some of the images.  Some of the styles are very traditional old school graffiti-esque:

by Atom One from Dortmund, Germany

by Bonza from Strasbourg, France
by Jorz from Melbourne, Australia
While some are more design, font and typography oriented.  I think this would make a pretty cool framed print:

by Aske from Moscow, Russia  


These next two take the cake for cuteness:

by iLK from Paris, France


by Popil from Shanghai, China


 And I simply cannot stop looking at these ones for their cool black and white graphic complexity:

by Casper from Osaka, Japan


by L'Atlas from Paris, France
by Xpome from Sofia, Bulgaria

Then there are the ones that are fabulously ace works of art in their own right.  Paism used 246 nails and yarn to create this alphabet:
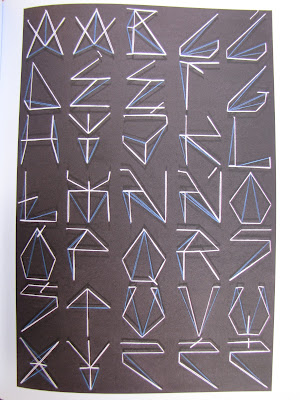
by Paism from Gryfice, Poland


And Ripo, originally from New York City but now living in Spain, used white enamel paint on mirrors to create his alphabet.  He then put up the mirrors on the streets of Barcelona and took pictures of the reflections.

by Ripo from New York City, USA
He explains the concept thus: "Graffiti usually fills in the "negative" or forgotton spaces of cities - ignored parts of signs, doors, walls...I played off this concept by painting in the negative spaces of the letters and letting the city fill in the rest."


Detail from alphabet by Ripo


WOW, right?  Very clever and really unexpected, don't you think?

So which is your favourite?  Does this make you see graffiti and street art in a different light?  Do you have letters or writing or alphabet prints adorning the walls your home?  I'd love to hear about it if you do.

Now I'm off to browse through my new book really carefully and soak up all that lettery goodness!