This song had me singing along the very first time I heard it on my car stereo. Then I saw the vid and now all I want to do is hightail it to the beach. Anyone coming for the ride?
Monday, December 6, 2010
Friday, December 3, 2010
Friday Lunchbox #18
Today's lunchbox:

Morning Tea: Seaweed rice crackers and mix of craisins (dried cranberries) and sultanas.
Lunch: Chicken, sweetcorn and green capsicum cream cheese pinwheels with fresh fruit mix of green grapes, red grapes, blueberries and strawberries.
Drink: Iced water
The pinwheels are made with mountain bread which is a type of flat bread - simply spread your chosen filling on, roll up and slice into bite size pieces. They are a great party finger food too.
Miss Six will be finishing school for summer holidays next Thursday so this is the last Friday Lunchbox for quite some time. I think I have done what I set out to do when I started this series - to inspire myself out of the lunchbox boredom I was getting into! I'm finding it much more fun now and a whole lot easier to be thoughtful about what goes into them on a daily basis. I really hope I've inspired you too!
Have a brilliant weekend, everyone : )
Wednesday, December 1, 2010
How To Make A Terrarium
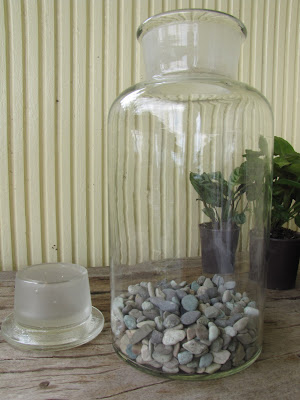
I've been wanting to make some terrariums for ages after finding some fabulous old bottles complete with glass stoppers at a local thrift store. (Those are the two at the back. The one at the front is an old coffee bottle with a plastic base on the stopper)

I've also been inspired by some beauties I've seen on the internet (apparently they were all the craze overseas a few years ago! How the heck did I miss that?) and the universe was definately telling me it was meant to be when I discovered this old book straight out of the 70's in my Mum's huge bookshelf.

I just love the line drawings and diagrams in it. They make me want to draw similar things and maybe even break out my colour pencils or watercolours. Which completely reminds me of Geninne's blog and the beautiful paintings of terrariums which she creates.


So if you'd like to create a terrarium of your own, there are a few things you'll need.
Glass containers (if they are small, make sure they are shallow enough that you reach and manipulate what's inside with your fingers, if they are tall, make sure your hand can fit through the opening!)
Pebbles or small rocks
Larger pebbles, shells, wood pieces, plastic animals - whatever takes your fancy to accessorise your terrarium
Charcoal (garden supply or aquarium supply shops will have this)
Peat or Sphagnum Moss (optional)
Potting mix
Small plants
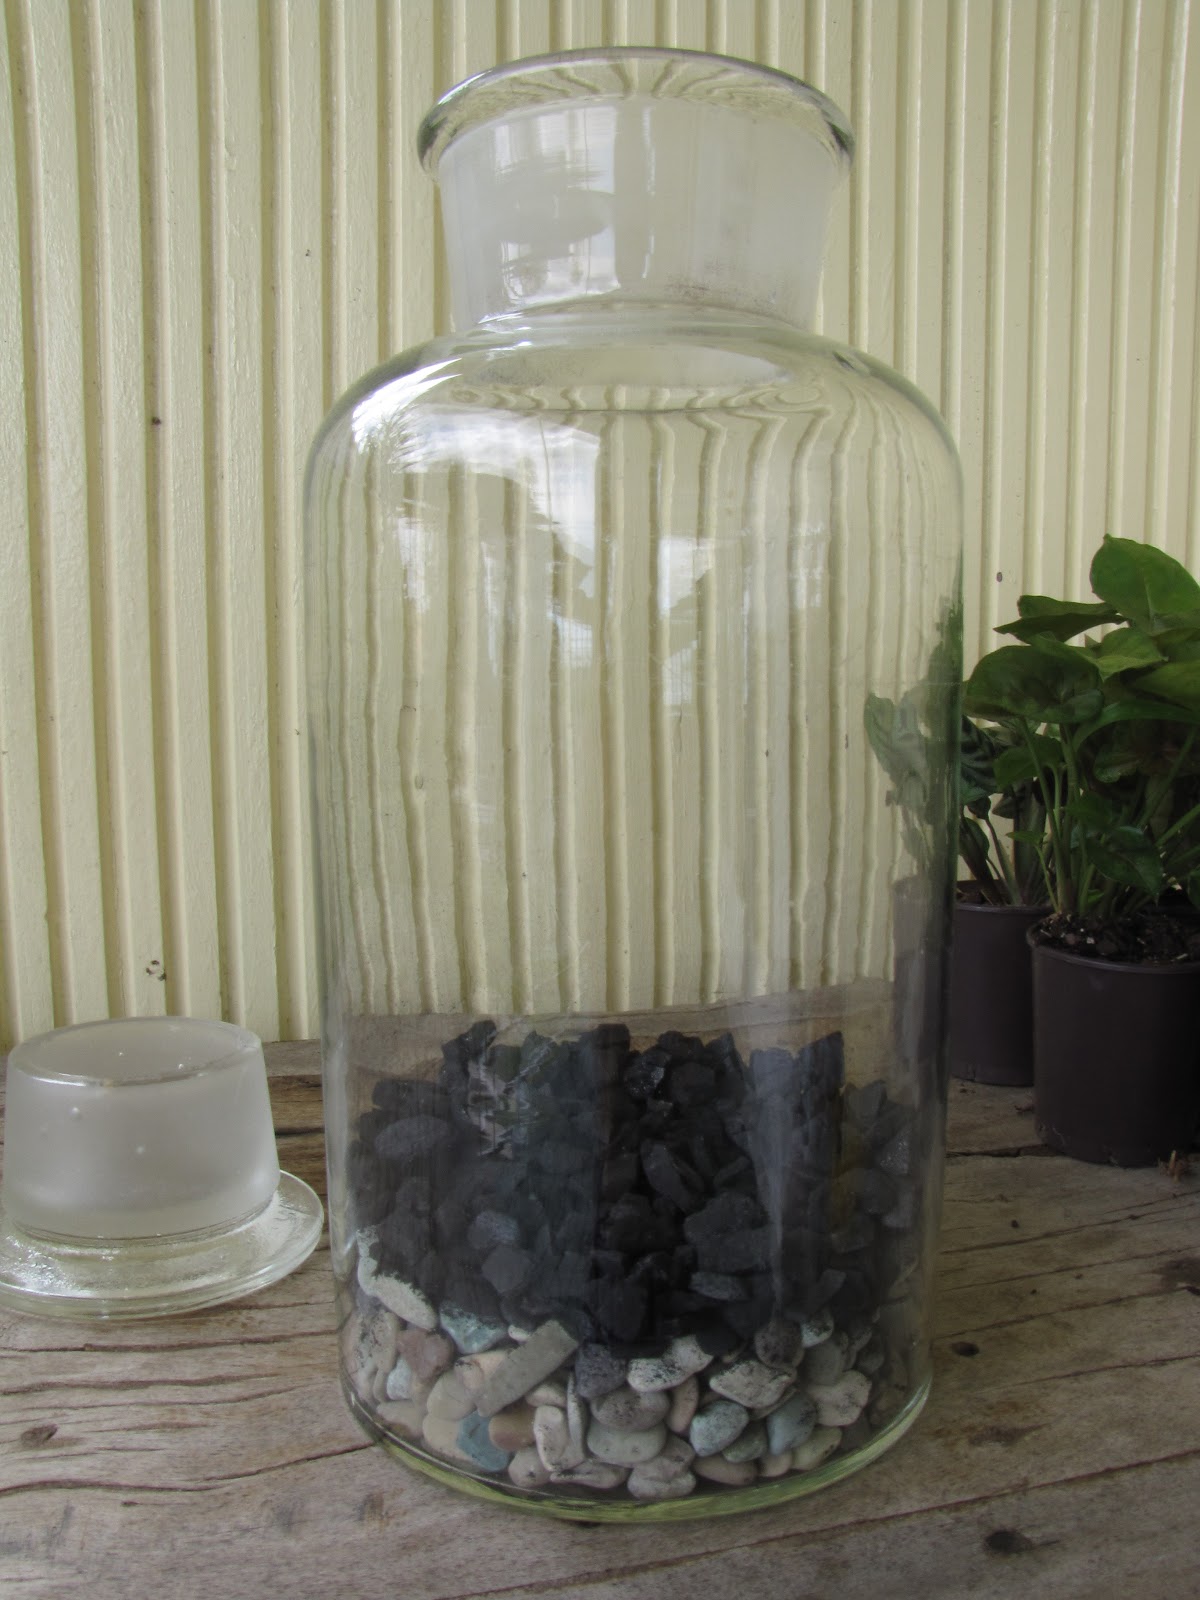
Make sure your chosen container is nice and clean then put a thin layer of pebbles down. If you have a tall jar (like I did) make a funnel from paper and shoot them straight down into the bottom. This totally stops you from freaking out that the jar is about to break cause the pebbles are bouncing around like kids on tartrazine.

Add a thin layer of charcoal. This will stop any nasties from developing as your terrarium matures into it's own self sufficient environment.


Now you have two choices. You can either go straight into adding the potting mix or you can put down a layer of moss. I chose to use some sphagnum moss as I really wanted a striking layered effect in the soil part of my terrarium. But it certainly won't hurt your terrarium if you decide to leave it out.
So, sphagnum moss...


Then soil. Be careful to keep your layers thin. Mine in the picture above are a little too thick and there ended up being hardly any room for the plants. I had to tip the lot out, sort it through (which took forever) and redo it all with thinner layers in the picture below. Much better!

Now the fun part - plants!
I used my hand in the bottle to get the plants into position and then a skewer to help move the soil and other decorative items around. This whole process took a bit of patience in getting it looking exactly how I wanted it to be, so take your time. You could also use a chopstick, long surgical tweezers or a long handled spoon to help with this part. I also used a spray bottle to squirt down any of the dirt which I happened to flick up onto the sides and then a tissue wrapped around the end of the skewer to clean down the inside of the glass when I was finished. Be careful not to overwater your terrarium - the water does not drain away like in a normal garden and you don't want to drown your plants.


Love that little snaily shell.

For now they are sitting on my side table in our living area, however they are eventually destined to end up on my craft room windowsill once I have redecorated that area. I heart them very much!

I've also been inspired by some beauties I've seen on the internet (apparently they were all the craze overseas a few years ago! How the heck did I miss that?) and the universe was definately telling me it was meant to be when I discovered this old book straight out of the 70's in my Mum's huge bookshelf.

I just love the line drawings and diagrams in it. They make me want to draw similar things and maybe even break out my colour pencils or watercolours. Which completely reminds me of Geninne's blog and the beautiful paintings of terrariums which she creates.


So if you'd like to create a terrarium of your own, there are a few things you'll need.
Glass containers (if they are small, make sure they are shallow enough that you reach and manipulate what's inside with your fingers, if they are tall, make sure your hand can fit through the opening!)
Pebbles or small rocks
Larger pebbles, shells, wood pieces, plastic animals - whatever takes your fancy to accessorise your terrarium
Charcoal (garden supply or aquarium supply shops will have this)
Peat or Sphagnum Moss (optional)
Potting mix
Small plants
Make sure your chosen container is nice and clean then put a thin layer of pebbles down. If you have a tall jar (like I did) make a funnel from paper and shoot them straight down into the bottom. This totally stops you from freaking out that the jar is about to break cause the pebbles are bouncing around like kids on tartrazine.


Add a thin layer of charcoal. This will stop any nasties from developing as your terrarium matures into it's own self sufficient environment.

Now you have two choices. You can either go straight into adding the potting mix or you can put down a layer of moss. I chose to use some sphagnum moss as I really wanted a striking layered effect in the soil part of my terrarium. But it certainly won't hurt your terrarium if you decide to leave it out.
So, sphagnum moss...


Then soil. Be careful to keep your layers thin. Mine in the picture above are a little too thick and there ended up being hardly any room for the plants. I had to tip the lot out, sort it through (which took forever) and redo it all with thinner layers in the picture below. Much better!

Now the fun part - plants!

I used my hand in the bottle to get the plants into position and then a skewer to help move the soil and other decorative items around. This whole process took a bit of patience in getting it looking exactly how I wanted it to be, so take your time. You could also use a chopstick, long surgical tweezers or a long handled spoon to help with this part. I also used a spray bottle to squirt down any of the dirt which I happened to flick up onto the sides and then a tissue wrapped around the end of the skewer to clean down the inside of the glass when I was finished. Be careful not to overwater your terrarium - the water does not drain away like in a normal garden and you don't want to drown your plants.


For now they are sitting on my side table in our living area, however they are eventually destined to end up on my craft room windowsill once I have redecorated that area. I heart them very much!
Friday, November 26, 2010
Friday Lunchbox #17
Today's Lunchbox:

Morning Tea: Fresh orange pieces, homemade gingerbread biscuits
Lunch: Sweet and Savoury Jaffles - Savoury is "vegetarian pizza" with herbed tomato paste, cheddar cheese, corn kernels, green capsicum, tomato and kalamata olives in wholemeal bread. Sweet is "custard and cinnamon apple pie" with vanilla custard, pie apple and cinnamon sugar in homemade fruit bread.
Drink: Iced water


Miss Six is on a jaffle jag at the moment and has asked for jaffles every day this week. She calls them "baffles" which is way too cute for me to want to correct her just yet. So I've had to get quite creative with the fillings. The great thing about todays jaffles is that I get the other halves of both jaffles for my own lunch - yum! Also, gingerbread is her most favourite kind of biscuit - this is the very first time I've ever iced them though and it wasn't as scary as I thought it would be! I used a "royal icing" which is basically whipped egg white, icing sugar, a squeeze of lemon and a sprinkle of cream of tartar (I'd link to a recipe but I'm feeling a bit lazy...just Google it!). It set beautifully. I did end up with piping-bag-cramp though, which I'm still recovering from!
Have an awesome weekend, everyone!!
Friday, November 19, 2010
Friday Lunchbox #16
Today's lunchbox:

Morning Tea: Mixed grapes and two sorts of savoury mini muffin - 1.Curried cheese, chive and corn
2. Kalamata olive, feta and italian herbs
Lunch: Homemade spiced fruit loaf fingers with cream cheese filling, cherry tomatos, carrot stars and celery pieces
The spiced fruit loaf is made in our breadmaker - I have substituted the usual "mixed fruit and glace cherries" for our own mix of fruits - organic sultanas and prunes, homemade candied orange and lemon peel pieces (my mum makes those and they are much, much nicer than the stuff in bought mixed fruit) and uncrystallised preserved sweet ginger pieces. If you don't have a bread maker, an internet search for fruit bread recipes is sure to turn up one you like and you can substitute your own favourite mix of dried fruits. Or simply buy a good quality raisin bread loaf from the store!! It's delicious toasted for breakfast too.
And here is the muffin recipe - it's one of my absolute favourite recipes and is also my mum's - I have absolutely no idea where she got it from, though some sort of baking workshop way back in the '90's seems to ring a bell.
It's the best ever recipe because it's a really simple base recipe which you can then choose to make sweet or savoury and the add-ins are limited only by your tastebuds and imagination. I simply divided the base recipe in half once it was made and mixed two seperate flavour combinations through. To give you an idea of amounts, I used 1 tspn of curry, 1/2 a tblspn of fresh chives, a 125g can of drained corn kernels and about 1/3 cup cheddar cheese in the curried cheese, chive and corn muffins. The olive, feta and italian herbs took 7 chopped olives, about 2 tblspns of chopped feta, and fresh, very finely chopped herbs - 1 tblspn parsley, 1 tblspn oregano, 1/2 tblspn rosemary. Remember, these amounts are for mixing into batter halves, if you wanted to do just a one flavour batter, you'd double the amount of your chosen add-in combination.
Miss Six calls my mum "Nonna" so here is...
Your choice of "add-ins" - (see ideas at end of recipe)
Method
1. Sift flour and baking powder into a bowl, add salt and sugar (if using) and mix.
2. Combine milk, oil and egg with a fork in a seperate jug
3. Pour wet ingredients into dry ingredients and mix lightly with a fork - do NOT beat or over mix, the batter is supposed to be lumpy. ( If you over-mix you'll end up with tough muffins!)
4. Lightly mix in your choice of add-ins. Use your judgement for how much to add - remember there needs to be more batter than add-in if muffins are to rise well.
5. Spray muffin tin with spray oil or grease with butter or use paper muffin-cases. Divide batter evenly into muffin tin.
6. Bake in preheated 180 deg celcius oven for 15-20 minutes (8-10 minutes for mini muffins) until golden. Cool in tin for a minute or so before turning out to cool on wire rack.
Add-In Ideas - Savoury
Cheese, bacon, corn and herbs
Salmon, dill and brie
Spinich and feta
Pizza (ham, cheese, onion, olives, tomato)
Greek (feta, olives, sundried tomato, red onion)
Add-In Ideas - Sweet
Apple and cinnamon
Blueberry and raspberry (you can use frozen if not in season)
Cherry, coconut and dark chocolate
Date and pecan
Banana and milk choc chips
Ginger and macadamia
Hope you enjoy the recipe, I can't wait to hear what flavour combinations you all come up with - please share!!
Have a great weekend, y'all!

Morning Tea: Mixed grapes and two sorts of savoury mini muffin - 1.Curried cheese, chive and corn
2. Kalamata olive, feta and italian herbs
Lunch: Homemade spiced fruit loaf fingers with cream cheese filling, cherry tomatos, carrot stars and celery pieces
The spiced fruit loaf is made in our breadmaker - I have substituted the usual "mixed fruit and glace cherries" for our own mix of fruits - organic sultanas and prunes, homemade candied orange and lemon peel pieces (my mum makes those and they are much, much nicer than the stuff in bought mixed fruit) and uncrystallised preserved sweet ginger pieces. If you don't have a bread maker, an internet search for fruit bread recipes is sure to turn up one you like and you can substitute your own favourite mix of dried fruits. Or simply buy a good quality raisin bread loaf from the store!! It's delicious toasted for breakfast too.
And here is the muffin recipe - it's one of my absolute favourite recipes and is also my mum's - I have absolutely no idea where she got it from, though some sort of baking workshop way back in the '90's seems to ring a bell.
It's the best ever recipe because it's a really simple base recipe which you can then choose to make sweet or savoury and the add-ins are limited only by your tastebuds and imagination. I simply divided the base recipe in half once it was made and mixed two seperate flavour combinations through. To give you an idea of amounts, I used 1 tspn of curry, 1/2 a tblspn of fresh chives, a 125g can of drained corn kernels and about 1/3 cup cheddar cheese in the curried cheese, chive and corn muffins. The olive, feta and italian herbs took 7 chopped olives, about 2 tblspns of chopped feta, and fresh, very finely chopped herbs - 1 tblspn parsley, 1 tblspn oregano, 1/2 tblspn rosemary. Remember, these amounts are for mixing into batter halves, if you wanted to do just a one flavour batter, you'd double the amount of your chosen add-in combination.
Miss Six calls my mum "Nonna" so here is...
Nonna Lillabilly's Awesomely Versatile Muffins
Ingredients
2 cups self raising flour
1/4 cup caster sugar (ONLY if you are making sweet muffins, leave out for savoury)
1/2 tspn salt
1 tspn baking powder
1 cup full cream milk
1/3 cup vegetable or canola oil
1 egg (I use jumbo size)
Your choice of "add-ins" - (see ideas at end of recipe)
Method
1. Sift flour and baking powder into a bowl, add salt and sugar (if using) and mix.
2. Combine milk, oil and egg with a fork in a seperate jug
3. Pour wet ingredients into dry ingredients and mix lightly with a fork - do NOT beat or over mix, the batter is supposed to be lumpy. ( If you over-mix you'll end up with tough muffins!)
4. Lightly mix in your choice of add-ins. Use your judgement for how much to add - remember there needs to be more batter than add-in if muffins are to rise well.
5. Spray muffin tin with spray oil or grease with butter or use paper muffin-cases. Divide batter evenly into muffin tin.
6. Bake in preheated 180 deg celcius oven for 15-20 minutes (8-10 minutes for mini muffins) until golden. Cool in tin for a minute or so before turning out to cool on wire rack.
Add-In Ideas - Savoury
Cheese, bacon, corn and herbs
Salmon, dill and brie
Spinich and feta
Pizza (ham, cheese, onion, olives, tomato)
Greek (feta, olives, sundried tomato, red onion)
Add-In Ideas - Sweet
Apple and cinnamon
Blueberry and raspberry (you can use frozen if not in season)
Cherry, coconut and dark chocolate
Date and pecan
Banana and milk choc chips
Ginger and macadamia
Hope you enjoy the recipe, I can't wait to hear what flavour combinations you all come up with - please share!!
Have a great weekend, y'all!
Tuesday, November 16, 2010
Togs for crafty, gardeny sorts.
Summer's almost here and I am completely dreading going togs shopping. For those who arn't Queenslanders, togs are what we call swimsuits, ...I know they have lots of different names, even in different parts of Australia - what do you call them where you are? I've also noticed a sudden trend by all the magazine and designer folk to call a one piece swimsuit, a "maillot" (pronounced "may-yoo"). Apparently it's french for, er, one piece swimsuit.
So anyway, I'm pretty sure I'm not the only one who dreads togs shopping and I really , really, really wish I could just magic a cute little boyleg tankini set, in an awesome cut (no halters pleeeease) and fabric, out of thin air without all the dressing room drama and pining for the boobs I had in my twenties.
Even after doing a whole lot of internet searching, I didn't come up with much. However, I did find these three little beauties and though they are not something I personally would wear, I just had to share them with you because the prints they are made with are pretty fabuloso and crafty, gardeny designs are not something you see on togs everyday. They are all from Hotel Bondi Swim which is a Sydney based swimwear company. (Photos sourced from Hotel Bondi Swim also).
Check it out - for the patchwork fans...

For the crochet fans...

And last but not least, for those of us who love our garden gnomes (and also available in a maillot, now that we all know what that is)...

That last one makes me chuckle. I think I heart the granny squares the best. Which one's your fave?
Friday, November 12, 2010
Friday Lunchbox #15
Today's lunchbox:

Morning Tea: Tropical fruit salad of strawberries, watermelon, mango, pineapple and baby mint leaves, pre packaged muesli bar.
Lunch: Chicken and vegetable noodle cakes with cos lettuce, cherry tomatoes and cheese cubes
Drink: Water
I just have to say that I LOVE the fruit that is around at this time of year! YUM! It makes being healthy so very easy. Also, I tend to steer clear of pre packaged foods for Miss Six's lunch, (Miss Six...that sounds so weird) due to her peanut allergy there is not a great deal that she can have anyway. But it's nice to slip something in every now and then as I know it makes her feel that she is "just like the other kids". I only recently discovered Food For Health's range of products and am quite happy to give Miss Six their lovely muesli bars on occasion. The allergy information on the package does state that the product may contain traces of treenuts, but definately not peanuts - so if you are allergic to both this would not be the product for you. But it is also gluten, wheat and dairy free (if you have issues with those) and the dried fruit contained in it is sulpher free. And as an added bonus, they are Australian made by an Australian owned company. I'm happy to support that! If you are an Aussie with allergies, you can find their range at many of your local supermarkets in the health food section. Hooray!
And here's the recipe for the noodle cakes ( they're soooo good and don't taste like vegetables at all!)
Ingredients
200g vermicelli rice noodles
3 eggs
1 medium carrot, grated
1 medium zucchini, grated
2 shallots, finely chopped
1 tblspn chopped parsley
3/4 cup chopped cooked chicken
1 tblespn sweet chilli sauce
Pinch of salt
Small amount of oil for frying
Method
Soak the vermicelli noodles for about 5 minutes in boiling water and drain. Place noodles in a bowl and chop into smaller pieces. Thoroughly mix through eggs, carrot, zucchini, shallots, parsley, chicken, salt and sauce.
Heat oil in frypan until hot and place 1/4 cup amounts of noodle mix in, flattening with spatula and turning when golden brown.
These are totally great hot or cold and make a really quick and easy dinner too. If you are after a more adult flavour, swap the parsley for coriander, throw in an extra tablespoon or two of sweet chilli sauce and a teaspoon or so of fresh grated ginger. You could also try using chinese barbequed pork instead of chicken. Or go meatless if you're after a vegetarian meal. Serve with more sweet chilli sauce for dipping and a fresh green salad and you're set!
Happy weekend, everyone!

Morning Tea: Tropical fruit salad of strawberries, watermelon, mango, pineapple and baby mint leaves, pre packaged muesli bar.
Lunch: Chicken and vegetable noodle cakes with cos lettuce, cherry tomatoes and cheese cubes
Drink: Water
I just have to say that I LOVE the fruit that is around at this time of year! YUM! It makes being healthy so very easy. Also, I tend to steer clear of pre packaged foods for Miss Six's lunch, (Miss Six...that sounds so weird) due to her peanut allergy there is not a great deal that she can have anyway. But it's nice to slip something in every now and then as I know it makes her feel that she is "just like the other kids". I only recently discovered Food For Health's range of products and am quite happy to give Miss Six their lovely muesli bars on occasion. The allergy information on the package does state that the product may contain traces of treenuts, but definately not peanuts - so if you are allergic to both this would not be the product for you. But it is also gluten, wheat and dairy free (if you have issues with those) and the dried fruit contained in it is sulpher free. And as an added bonus, they are Australian made by an Australian owned company. I'm happy to support that! If you are an Aussie with allergies, you can find their range at many of your local supermarkets in the health food section. Hooray!
And here's the recipe for the noodle cakes ( they're soooo good and don't taste like vegetables at all!)
Chicken and Vegetable Noodle Cakes
Ingredients
200g vermicelli rice noodles
3 eggs
1 medium carrot, grated
1 medium zucchini, grated
2 shallots, finely chopped
1 tblspn chopped parsley
3/4 cup chopped cooked chicken
1 tblespn sweet chilli sauce
Pinch of salt
Small amount of oil for frying
Method
Soak the vermicelli noodles for about 5 minutes in boiling water and drain. Place noodles in a bowl and chop into smaller pieces. Thoroughly mix through eggs, carrot, zucchini, shallots, parsley, chicken, salt and sauce.
Heat oil in frypan until hot and place 1/4 cup amounts of noodle mix in, flattening with spatula and turning when golden brown.
These are totally great hot or cold and make a really quick and easy dinner too. If you are after a more adult flavour, swap the parsley for coriander, throw in an extra tablespoon or two of sweet chilli sauce and a teaspoon or so of fresh grated ginger. You could also try using chinese barbequed pork instead of chicken. Or go meatless if you're after a vegetarian meal. Serve with more sweet chilli sauce for dipping and a fresh green salad and you're set!
Happy weekend, everyone!
Thursday, November 11, 2010
Miss Six
Just recently, my little Miss Five became a very grown up Miss Six! Where on earth has my baby gone?

You can see what she got for her birthday there on her wrist. She also got a cubby house (with a slide!) made by my hubby (thankyou so very much sweetheart, you're very clever.) I totally wish I'd had a watch and a cubby (with a slide!) when I was six.

You can see what she got for her birthday there on her wrist. She also got a cubby house (with a slide!) made by my hubby (thankyou so very much sweetheart, you're very clever.) I totally wish I'd had a watch and a cubby (with a slide!) when I was six.
Monday, November 8, 2010


Friday, November 5, 2010
Friday Lunchbox #14
Today's Lunchbox...

Morning Tea - Fresh mango cheeks, homemade trail mix of sultanas, raisins, popcorn, croutons and oven roasted pumpkin seeds.
Lunch - Chicken and vegetable risotto arancini with cheddar cheese centres, salad of cos lettuce, mini tomatoes and carrot stars.
Drink: Water
If you make risotto, then you can make arancini with the leftovers! Wear a pair of disposable gloves to ball the risotto up (do a half ball and add a cheese cube to the centre, if you wish, before adding more risotto to make the other half) , roll your arancini in plain flour, dip in egg, roll in breadcrumbs and fry in a little hot oil. Fun and a bit messy but very easy and they are delicious hot or cold!
Have an awesome weekend, everyone!!
Wednesday, November 3, 2010
Art
I have just stumbled on this beautiful little vid through the blog of one of my lovely, lovely followers, Tara, and I had to share it with you all. I think you should head on over to Tara's blog On A Branch to read what she has to say about creating art as an adult when you havn't for some time. I could definately relate and I'm sure many of you will be able to as well.
When I was little, I used to spend hours on end drawing and colouring and painting. There was nothing quite like the smell and excitement of new art materials, be they paints, pens, crayons or colouring pencils. I remember that if I ever got a new set I would have to try out every colour on a "test paper" before I could even contemplate creating a piece of art from them. I'm pretty lucky to have a creative mother who knew the benefit of good quality art materials and provided such, though they were still pretty basic. At least I was completely spared of felt pens which run out after five strokes, pencils which break as you sharpen them and paints that come out with colours that are thin, muddied and insipid. I remember my Dad bringing home big reams of continuous computer paper (the kind that had blue stripes on one side, a perforation between each sheet and holes all the way down each edge for the grippers on the printer) from his work and these reams used to take pride of place on the corner of my desk so that I could tear a piece off and create as the mood took me. I remember loving the smell of the art room when I was in primary school but hating the thick brushes that they provided which were always gummed up with old paint and only ever created thick blobby marks on the paper. I also remember being completely envious of my best friend's super dooper brand new Crayola Caddy!! Do they still make those?
Did you used to draw and paint as a child? What did you love about it? What didn't you love? Do you still create?
Tuesday, November 2, 2010
Snaily
Today at school drop off time, all the little girls in my daughter's class were fascinated by a small snaily fellow wandering along the seating.
After I came home and was writing out my groceries list, this appeared from the end of my pen...

I miss drawing.
I need to make time to do it more often.
After I came home and was writing out my groceries list, this appeared from the end of my pen...

I miss drawing.
I need to make time to do it more often.
Friday, October 29, 2010
Friday Lunchbox #13

Today's Lunchbox...
Morning Tea - Strawberry yoghurt and nut-free choc-chip biscuit (both homemade)
Lunch - Chicken, cheese and salad "Mountain Bread" wraps, fresh watermelon pieces
Drink - Water
I am a little excited that I now know how to make yoghurt. Basically, you heat some milk, then cool it a little, then stir in a big spoon of natural yoghurt, then put it in a warm place (like a pre heated thermos - I have bought an "Easi-Yo" maker which is a bit thermos-like) and leave it for 8 or so hours. Who knew it was so easy!? Did you? I didn't. I've flavoured this yoghurt with strawberry jam and fresh strawberry pieces and the last lot I made I flavoured with honey. But you can use anything you like - your imagination is the limit. I cannot believe how delicious and fresh it is! And did I mention easy? If you want a little more detail as to how to make yoghurt, check out Amanda's excellent post on SouleMama. She uses a thermometer for the milk heating which I don't bother with - and all of my yoghurts have turned out well so far, so I figure it's a little forgiving just as long as you are aware that mixing in the yoghurt while the milk is too hot will kill the live cultures and you wouldn't want that! (Unless of course, you feel like making milkshakes instead of yoghurt!) I totally can't wait 'til it gets a bit hotter and I can start making (and eating!) frozen yoghurts. Mmmm, YUM!
Friday, October 22, 2010
No Friday Lunchbox Today...Sad Face
So, I was really hoping my blog would go viral but instead, I have.
You guessed it, I'm sick. Bleh. Hopefully by next week, yours truly will have returned to her regular programming but until then here's a sneak peak of one of my current projects. I hope you have a lovely weekend. I'm going back to bed.

You guessed it, I'm sick. Bleh. Hopefully by next week, yours truly will have returned to her regular programming but until then here's a sneak peak of one of my current projects. I hope you have a lovely weekend. I'm going back to bed.

Tuesday, October 19, 2010
Paw Paw Chutney
At the moment we have way too many paw paws. Despite giving lots away to family and friends and the resident possum sneaking a few when we got a little slack about picking them, we are still usually left with a back log of three or four. And I can only eat so much paw paw! So what do you do when you have too much paw paw? Make paw paw chutney, of course! (But you already had that worked out, didn't you? 'Cause you were clever and read the title!)

And how great is the internet? You ask and it provides. I found a few fabulous chutney recipes, got hubby to choose one he thought he might like the best and set about making chutney.
The recipe I used is here by Chef Alison Alexander at the 612 ABC website but for quick reference and with a few of my own added hints, here it is below as well. It requires that you make a "spiced vinegar" to go in the chutney so a good bit of time is needed if you decide to make this. But it's well worth it. And there is also a maturing time of 4 weeks for the flavours to develop. During the making I was a bit alarmed at how vinegary it smelt (talk about burn out your nasal passages!) and even tasted at the end. But I put the last spoonful that couldn't fit into my bottles, in a dish, in the fridge and sampled it the next morning. It was absolutely divine and not a bit vinegary in the least. I can only imagine how good it will be after four weeks.
If you are going to have a go, don't forget to sterilize your jars first. It's quite easy, the way I do it is to fully immerse the jars and lids in a pot of water, bring to boiling point and boil for 10 minutes. I remove them with tongs and place them on a tray in a slow oven to dry for about another ten minutes. Then allow them to cool before filling.

Paw Paw Chutney
by Chef Alison Alexander
Bracketed notes by Lillabilly
Ingredients
Spiced Vinegar:
2.5 litres vinegar (I used white)
250 g sugar (I used white for this too)
60g bruised ginger (peel fresh ginger and "bruise" by pressing down on it with the flat of your large knife or by giving it a bit of a bash with a mallet)
2 bay leaves
2 blades mace (I couldn't find this, but the nearest substitute is nutmeg. I used 1/4 tsp)
6 whole cloves
1/2 cinnamon quill
2 tblespns white peppercorns (I couldn't find these either so I used the mixed variety)
1 tblespn white mustard seed
1 tsp salt
Chutney
1.5 kg paw paw, ripe or slightly under-ripe
1 kg ripe tomatos skinned (do this by immersing the tomatos in boiling water until the skins split. They will then come off quite easily when you rub them. I'm not a fan of tomatos seeds in things so I squished mine to get most of the seeds out and chopped them roughly too, make sure you measure a kilo after you do that)
2 hot chillies, seeds removed (I finely chopped these)
500g sultanas (go through these by the handful to ensure none have tiny hard stems still attatched)
30g finely grated ginger
30g finely chopped garlic
2 onions, very finely chopped (I used brown)
1 tblspn salt
500g brown sugar
Method
1.Vinegar: Place all ingredients in a large stainless steel pot and bring slowly to the boil, stirring to dissolve the sugar. Simmer uncovered, for 20 minutes, then remove from heat and allow to stand, covered, for 1 hour. Strain vinegar (use a fine seive to get that nutmeg out) and pour into sterilized bottles for later use. (Since you only need 1.2 litres for the chutney, I put that amount aside and put the rest in a bottle. Not sure what I'll do with it yet!)
2. Chutney: Dice paw paw and place into large (Yes! It needs to be large!) stainless steel pot with remaining ingredients and 1.2 litres of spiced vinegar. Slowly bring to boil then simmer for 2 hours or until mixture has a jam like consistency. ( I stirred mine fairly regularly. You will need to make sure you watch the heat and stir it a bit towards the end when there is hardly any liquid left or it will burn. Turn the heat down a bit at this stage if needed and don't walk away!)

3. Remove from heat and spoon into sterilized jars and seal immediately. Store in a cool dark place (Once my jars had cooled completely I put them in the fridge 'cause I'm paranoid like that) Allow to mature for 4 weeks before using. Chutney very good with pork, ham or lamb (or beef! or on meat, cheese and salad sangas!)

For a smoother texture, paw paw, tomatos, chillies, sultanas, ginger and onions can be pureed in a food processor before cooking. (I like chutney to have a bit of body to it and most of it cooks down to be very soft and squishy so I think finely chopping everything is a nicer way to go. But you might not! So you should definately do whatever you think you might like better.)
And that's it! It makes heaps - I filled about 8 medium sized jars and a couple of smaller ones so there is lots for sharing around or giving as gifts. Here's some of my finished product happily maturing away.

Can't wait to try it out! Do let me know if you have a go of this. Happy chutneying, everyone!
Friday, October 15, 2010
Friday Lunchbox #12

Today's Lunchbox...
Morning Tea: Seaweed and plain rice crackers with tomato dip.
Lunch: Homemade pizza fingers, fresh blueberries with canned apple and a sprinkle of cinnamon sugar.
Drink: Water
Because of Miss Five's peanut allergy we tend to avoid bought dips (not to mention the fact they often contain preservatives and other nasties) but it's no hassle as it is so very quick and easy to make our own. The tomato dip here simply contains a few spoons of Light Philedelphia Cream Cheese (I use "light" because it's softer than the regular, so is easier to mix and we only buy the one in the rectangular box as the one in the tub has preservatives. Why on earth do they do that, I wonder?), some chopped fresh tomato (no seeds), and a squirt of organic tomato sauce. Whip it together with a fork for about 30 seconds and voila! This dip can contain any number of yummy things depending on your child's tastes and is also marvelous for adults too. Try any one or mix of the following - chopped beetroot (pink dip!), diced capsicum, garlic, herbs, sweet chilli sauce, spinich, avocado and lemon, fried bacon and onion, chopped kalamata olives (great with tomato, basil and red onion), mashed pumpkin...I'm sure you can think of more!
The pizza fingers are leftovers from our homemade pizza which we had for dinner. Again, top this how you like. While you could easily use the bread base recipe from Friday Lunchbox #1 as a pizza base, I personally find it a little soft for pizza. I prefer to use the following recipe which is my own personal one:

Homemade Pizza Base
Ingredients:
1 tsp white sugar
1 tsp salt
7g sachet of dried yeast
2 tblspns olive oil
1 cup lukewarm water
2 2/3 cups plain bread flour
Method
Combine sugar,salt, yeast, oil and water in a large bowl. Sift in flour and mix to a dough. Knead for a few minutes until it reaches an "elastic" consisentcy. Reflour bowl and leave dough, covered, for approx 40 minutes until it has doubled in size. Punch down dough and reknead breifly before using a rolling pin to roll into desired shape. (This amount of dough makes a big rectangular pizza which fills my 38cm x 24cm tray and ends up being a thick base. You could also cut the dough in half and roll thinly to reach the same size for two thin base pizzas. If you have a smaller circular tray it will definately be enough dough to make two bases of a good thickness.)
Spread with sauce and desired toppings before baking in a 200 degree celcius oven for approx 20 minutes.
Delish!
It absolutely leaves store bought bases for dead. Let me know how you get on making it, I know you'll love it. Have an awesome weekend, everyone!
Monday, October 11, 2010
Crochet Update
Before the school holidays, I finally finished my last granny square for the throw blanket I am making for Miss Five. Here they are...

All one hundred and sixteen! I didn't do any crochet over the holidays but now they are all laid out on the loungeroom floor and I am painstakingly slip-stitching them together. It feels like it's taking forever but I keep reminding myself that it takes time to sew love into every stitch and you can't get that out of a mass made product from China.
And because it's fun to add to the chaos by having more than one project going at anytime (am I the only person who does that?) I decided to teach myself how to ripple! I've noticed lots of ripple and zigzag blankets happening in the crochety world of late and they all look pretty swish. And since my nextdoor neighbour is pregnant I thought it would be a fabulous opportunity to ripple a baby blanket - something of a size that's not too daunting and that I'd be able to whip up a whole lot quicker than Miss Five's throw.
The lovely Hilary from here gave me a link to a marvelous rippley tutorial from over here. I had seen this tute ages ago but forgot to bookmark it and then couldn't remember where it was. So thanks, Hilary!! (You should definately check out Hilary's awesome rippley goodness, I love the colours she is using)
Anyway, it seemed fairly straightforward with a couple of things I needed to learn (increasing and decreasing stitches) so I started on a small sample. To begin with you have to chain a certain amount of stitches and then work your next row of stitches into the chain.
Well, I am not one for swearing (there are way too many other delightful words to use) and my hubby and close friends will tell you that when I swear they come running cause I clearly have good cause. But working the first row of stitches into the chain? That was an absolute bee eye tee cee aitch, let me tell you!! To prove my point, here is my first attempt...

Gracious! What the heck is that thing?? My tension is all over the shop and it doesn't even come close to resembling anything remotely ziggy or zaggy. And getting my hook into each chain was absolute murder. I came very, very close to ending up the same way Pip from Meet Me At Mikes did when she first attempted learning to crochet. She cried, people. And I now understand completely why she did that. I do.
But instead of succumbing to the tears, I blinked a lot, cut that attempt off, went and had a cup of tea, came back, took a really deep breath, exhaaaaaaaaaaaaaled and began again. This time I went awfully slowly and carefully, watching my tension and being really, really patient with those chains. And look what happened!!

It's not perfect but it's much better, isn't it? It's quite ziggy. And the second row was a breeze. I can definately handle that problematic chain knowing how easy the rows afterwards will be

So after a little more practice I have some lovely white, navy and two nice blues to start rippling with (yes, my neighbour is having a boy). Wish me luck!
Subscribe to:
Posts (Atom)